Preparing Your Birds For Show
The first step in show preparation is choosing which birds to exhibit. When choosing birds for exhibition, ensure that your birds are healthy. Ensure that your birds are free of parasites. It is common and responsible practice for judges to request that sick, injured or infested birds be removed from the show hall. Ensure that your birds are treated for mites in the days before the show.
Wash your birds a few days before the show. This provides enough time for the production of natural oils which will naturally be replaced after washing. These oils are essential for adding a natural shine to your birds feathers. When washing, place tepid water in two containers. In Container A, add baby shampoo. In Container B, add a tablespoon of malt vinegar. Wash your bird in Container A, ensuring that you do not submerge the birds head. Wash the bird thoroughly. Pay particular attention to areas which may naturally hold more dirt, such as around the vent, legs and feet. Clean the legs and feet with a soft toothbrush, making sure to remove dirt from the toenails. Using your fingers, clean any dirt that may be on the comb, wattles and earlobes.
Next, place your bird into Container B. Rinse the shampoo completely from your bird. Wrap a towel around bird to avoid water dripping while moving the bird to dry it. When drying a bird, use a hairdryer at low heat. When drying birds with a hairdryer, I always dry from the back of the bird forward to add volume to the feathering. Make sure that you dry your bird completely. When completely dry, return your bird to its pen on a deep bedding.
On the morning of the show, carry out a check on your birds. Do not feed your birds on the morning of the show as it may alter the shape of your bird (full crop). Ensure that feathers, legs, toenails, comb, wattles etc. are clean. Transport your birds in a large container with deep bedding. Large cardboard boxes are ideal for transporting birds.
When you arrive at the show, collect your penning slip, and begin to cage your Birds.
When penning your birds, rub a small amount of petroleum jelly onto the bird’s comb, wattles and legs to create a shine.
Good luck to all of you and, most importantly, enjoy the show.
Artificial Incubation
It is all too easy to get caught up in the idea of having fluffy chicks around. But, everyone should have a definite reason for hatching chicks.
If it is to rear birds for showing or for laying that is fine. But, hatching just because you have fertile eggs and an incubator is not. The amount of eggs hatched has to be taken into consideration also. The facilities that a person has, the space available and the size of the existing flock have to be considered.
The welfare of the birds hatched is the responsibility of the poultry keeper. The poultry keeper has a duty of care to his birds. It also has to be remembered that at least 50% of the birds hatched will be male. The poultry keeper needs to be clear what he/she is going to do with these excess males.
Incubator
There are two types of incubator. There is the Forced Air and Still air incubators. In the Forced Air incubators the air is drawn in and circulated with a fan so that there should be an even temperature throughout the interior of the incubator. In the Still Air incubator the circulation of air is by convection caused by warm air rising and cool air falling.
The still air incubators can be loaded with several trays but with the natural or still air incubators the eggs must be place at one level only.
When picking an incubator you must make the correct choice to suit yourself. First of all the egg capacity of the incubator must be decided. Next, how the eggs are turned has to be decided. The manual units have no egg-turning capacity. The owner must remember to turn the eggs a few times a day at regular intervals.
The next one is the semi-automatic. This has an external lever that’s operated by the user to turn the eggs, all at the same time, in one simple action. The automatic incubators turn the eggs, every hour on the hour. Some of these automatic incubators also have a water tank. This is used to regulate the humidity. The more sophisticated the machine, the more expensive it is. Some people use the automatic incubator up until the last few days and then use a manual incubator for hatching only.
The fan- assisted incubators can be fiddly to clean between hatches. By using a separate hatching incubator you will cut down on the amount of cleaning. Cleaning between hatches has to be a top priority as the warm and damp condition in an incubator provides perfect condition for the growing of bacteria.
Follow the instructions from the incubator manufacturer, paying particular attention to humidity and temperature.
Eggs
The eggs need to be incubated for the correct length of time, at the correct temperature and humidity, and turned on a regular basis. It is the number of variables involved that determines the success of the hatch.
The quality of the eggs is very important. Eggs need to be sourced from a reliable breeder as some diseases can be carried in the egg and aren’t obvious. Healthy birds breed healthy chicks. The eggs should be the best eggs from the best birds.
There is no point in wasting time and effort in poor quality birds. Eggs should be clean and as near the correct shape and colour for the breed as possible. Eggs can be washed with an egg sanitiser but it is best to have clean nest boxes in the first place. A breeder, who supplies dirty eggs, may be careless in his/her husbandry of his birds. Putting dirty eggs into an incubator is only asking for trouble as the warm humid conditions is a breeding ground for bacteria.
The eggs should be dated using a soft pencil only and not a pen, as the eggs are porous. The breed of the bird should also be marked on the egg as you need to know firstly which ones were fertile and maybe which eggs there were hatching problems with.
Eggs for hatching should be stored away from sunlight but not in a fridge. They should be set within 14 days but around a week is best. There are always exceptions to this and eggs may be fertile for longer than the 14 days. If possible tilt or turn the eggs once a day. Storing them in an egg box with the pointy end down is accepted as safe.
Do not mix waterfowl eggs with hen’s eggs, as the incubation lengths are different. Also, some bantam eggs require shorter incubation times so if possible try not to mix bantam and large fowl eggs.
It is a good idea to candle eggs before setting them in the incubator. This checks them for any cracks as a crack would allow bacteria into the egg and therefore into the incubator.
The incubator should be run for at least 24 hours before setting eggs. The temperature should be checked and also the humidity.
There should be a steady temperature so the siting of the incubator is very important. The incubator should be in a room that doesn’t have extremes of temperature. It shouldn’t be where sunlight might shine on it and of course it shouldn’t be a very dusty area. The room should be well ventilated, as the air needs to circulate to provide oxygen and remove carbon dioxide. But, there should be no draughts.
The moisture in the incubator is referred to as the humidity level. If there is a low humidity and the air is dry the membranes will dry up and the chick will fail to grow and will have difficulty getting out of the shell. It will also be late hatching. If the humidity is too high the egg will be too wet and the chick will drown in the excess. The air bubble at the base of the egg, which acts as a reservoir for the chick to breath, can be too small.
Incubation
Incubation times:
Chickens– 21 days.
Ducks— 28 days.
Muscovies— 35 days.
Ornamentals— 24-30 days.
Geese— 28-32 days.
Pheasants— 24-28 days.
Turkeys— 28 days
Guinea Fowl— 28 days.
Quail— 17 days.
Three days before hatching is due stop turning the eggs and increase the humidity. Air- flow needs to be increased also and this is achieved by adjusting the air vents on the incubator. This increases the oxygen to the chicks and gets rid of the excess carbon dioxide. Don’t spray the eggs with water as this can chill them.
Temperature
37.5C. Sometimes people lower the temp by about 1 degree for the hatch in the last three days.
Humidity levels during incubation.
Poultry 40-50%RH (relative humidity)
Waterfowl 45-55%RH
For the last three days the humidity levels need to be increased to at least 65%RH for all species. The way that this is achieved depends on the incubator being used.
The eggs should also not be rotated during the last few days and they should lie horizontal and not upright, so the dividing bars should be removed.
Candling
Candling is the process of shining a light on an egg to ascertain whether the egg is fertile and to see if there is an embryo and if so how it is developing. This should be done after the eggs have been in the incubator for between 10-12 days. At the first candling session it should be possible to see a spider-like shadow in the centre of the egg if it is fertile. Eggs that have started t develop and then stopped should have a dark blob but a blood-like ring in it. These eggs should be removed. A torch and a cardboard tube can be used for this but more consistent results are generally achieved using a purpose-built Candler. Candlers nowadays have LED lights, which don’t heat up the egg during the candling process. Avoid candling the eggs to often, as each time you open the incubator the humidity and temperature will alter and it will take a long time to regulate them again.
Incubation has a shrinking effect on the air space of the egg. So, regular candling of the egg or weighing of the egg can check this.
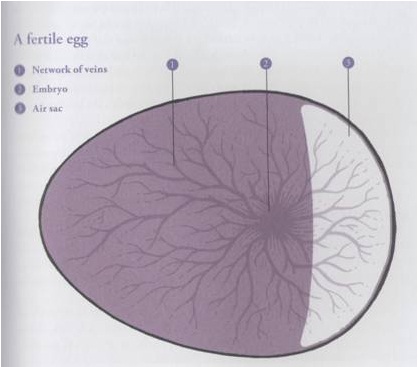
Fertile Egg 1 River Cottage Handbook NO 11
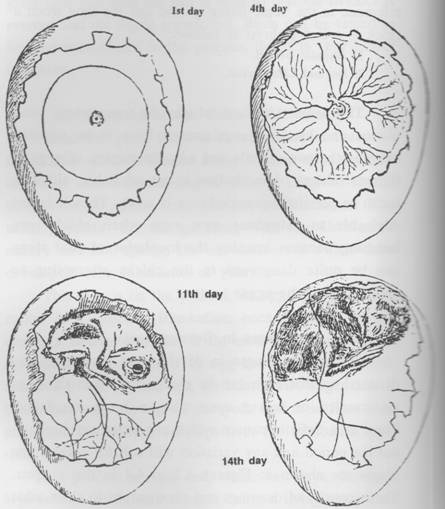
Development of the embryo
Don’t keep opening the incubator during hatching to check on progress as it takes a few hours to bring the temperature and humidity up to the correct level again.
Let the chicks emerge from the shells naturally. Any having difficulty shouldn’t be helped by picking away the shell.
The chicks should be left to dry fully before they are moved to a brooder. They should be left to rest and they don’t need water or food for 24 hours.
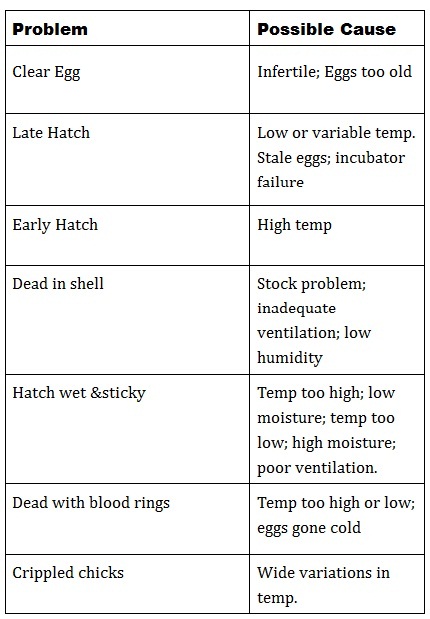
Incubator Failures
Don’t keep opening the incubator during hatching to check on progress as it takes a few hours to bring the temperature and humidity up to the correct level again.
Let the chicks emerge from the shells naturally. Any having difficulty shouldn’t be helped by picking away the shell.
The chicks should be left to dry fully before they are moved to a brooder. They should be left to rest and they don’t need water or food for 24 hours.
Incubator Failures
The incubation and hatching stages are only the beginning of the life of the chicks. The brooding process, which follows the hatch, is just as important.
Quarantine of New Stock
All keepers when buying in new birds should quarantine birds for a minimum period of 4 weeks to prevent disease's from being brought in. While in quarantine birds should be checked regularly for any signs of illness or contamination.
A good keeper will always handle the birds on a daily basis doing this gives us the ability to tell if the bird has lost weight or is suffering with mites or lice .
We advise people to practice the quarantining of birds as a measure to prevent spreading of disease an in doing so keeping your own birds safe.
Tips for the Cold Spell
Here are a few tips for poultry keepers during the winter months:
Provide your birds with extra bedding. If your birds are not free ranging, it would be a good idea to put straw in the outdoor pens too, to provide a protective layer against mud and water.
Ensure that your birds are protected from rain and drafts in their coops.
Ensure that all coops and pens are sturdy and able to withstand strong winds.
Steeping maize and in hot water and adding it to your food birds twice or three times a week will give your birds a hot treat during cold weather.
Oats are a very good heat releasing food, and also make a good addition to your food mix during cold weather.
During periods of heavy frost, ensure that you have a supply of fresh water for your birds. Water storage tanks are an excellent investment for any poultry keeper.
Water expands when frozen, causing some drinkers to crack. It is recommended to use open-topped drinkers during very cold weather to avoid the container cracking. Plastic sweet and biscuit boxes make excellent drinkers for this purpose.
Ensure that your pens and coops are vermin-proof as foxes etc. are more likely to attack poultry during cold spells as their natural food supply dwindles.
Egg production will slow or even cease in cold weather. This is a natural occurrence and your birds will resume laying when weather conditions improve.
Most birds should have completed their moult at this stage. However, you may have a few stragglers in your flock. Giving these birds some sardines in their feed twice a week will give them a much needed protein boost which will help them through their moult. When purchasing sardines, buy sardines in sunflower oil rather than brine as brine has a high salt content.
Copyright © 2020 Poultry Keepers Club of Ireland - All Rights Reserved
